2014-05-03 去把bilibili的返回顶点锚点扒了下来
今天闲来无事看着刷着bilibili对那锚点标记觊觎已久,下决心将其收为己用,遂动手.
个人主推Firefox+firebug查看网页代码.我用的是夜壶(nightly),就火狐的每日更新版(建议不用,有时一日三更重启非常蛋疼).
网页代码,css和图片容易弄,哪里想要点哪里,左边是代码,右边是css和其他,背景图的话,右键路径在新页面打开保存就行.
主要是绑定的javascript事件麻烦.楼主一开始傻BB就对着那个锚点的divid找啊找,找到了一些但死活找不到事件.后来firebug会用了就简单多了.点击标签绑定的是goTop函数,在firebug的控制栏里输入”goTop”,然后点”RUN”,那个函数就会出现了,找到之后还可以右键美化源代码,方便复制过去.输”goTop()”的话是执行.不一样的.
bilibili的锚点是挺有趣的, 首先其位置设置的不错,会根据元素在当前视口的相对偏移设置,其次是它让人流氓滚,在点了页面开始调用函数之后一旦你往下滚轮它还是会用生命滚到页首,直到完全触顶为止.
1
2
3
4
5
6
7
8
9
10
11
12
13
14
15
16
17
18
19
20
21
22
23
24
25
26
27
28
29
30
31
32
33
34
35
36
37
38
39
40
41
42
43
44
45
46
47
48
49
50
51
52
53
54
55
56
57
58
59
60
61
62
63
<html xmlns="http://www.w3.org/1999/xhtml">
<head>
    <meta http-equiv="Content-Type" content="text/html; charset=utf-8" />
    <title></title>
    <script src="../Scripts/jquery-1.10.2.min.js"></script>
    <script>
        $(function () {
            $('body').append('<div id="gotop" onclick="goTop();"></div>');
            $(window).scroll(function () {
                300 < $(this).scrollTop() ?
                ($('#gotop').show(),
                $('#gotop').css('left', $('.z').offset().left + $('.z').width() + 20),
                $('#gotop').css('top', $(window).height() - 300))
                : $('#gotop').hide()
            });
            $(window).resize(function () {
                $('#gotop').css('left', $('.z').offset().left + $('.z').width() + 20)
            })
        });
        function goTop(u, t, r) {
            var scrollActivate = !0;
            if (scrollActivate) {
                u = u || 0.1;
                t = t || 16;
                var s = 0,
                q = 0,
                o = 0,
                p = 0,
                n = 0,
                j = 0;
                document.documentElement && (s = document.documentElement.scrollLeft || 0, q = document.documentElement.scrollTop || 0);
                document.body && (o = document.body.scrollLeft || 0, p = document.body.scrollTop || 0);
                n = window.scrollX || 0;
                j = window.scrollY || 0;
                s = Math.max(s, Math.max(o, n));
                q = Math.max(q, Math.max(p, j));
                p = 1 + u;
                window.scrollTo(Math.floor(s / p), Math.floor(q / p));
                0 < s || 0 < q ? window.setTimeout('goTop(' + u + ', ' + t + ')', t) : 'undefined' != typeof r && r()
            } else {
                scrollActivate = !0
            }
        }
    </script>
    <style>
        #gotop:hover {
            background-position: 0px -116px;
        }
        #gotop {
            width: 29px;
            height: 106px;
            position: fixed;
            display: none;
            cursor: pointer;
            background: url('go_to_top.png') no-repeat scroll 0px 0px transparent;
        }
    </style>
</head>
<body>
    <div class="z" style="border: 1px dashed; height: 2999px; width: 977px; margin: 0 auto;">
    </div>
</body>
</html>

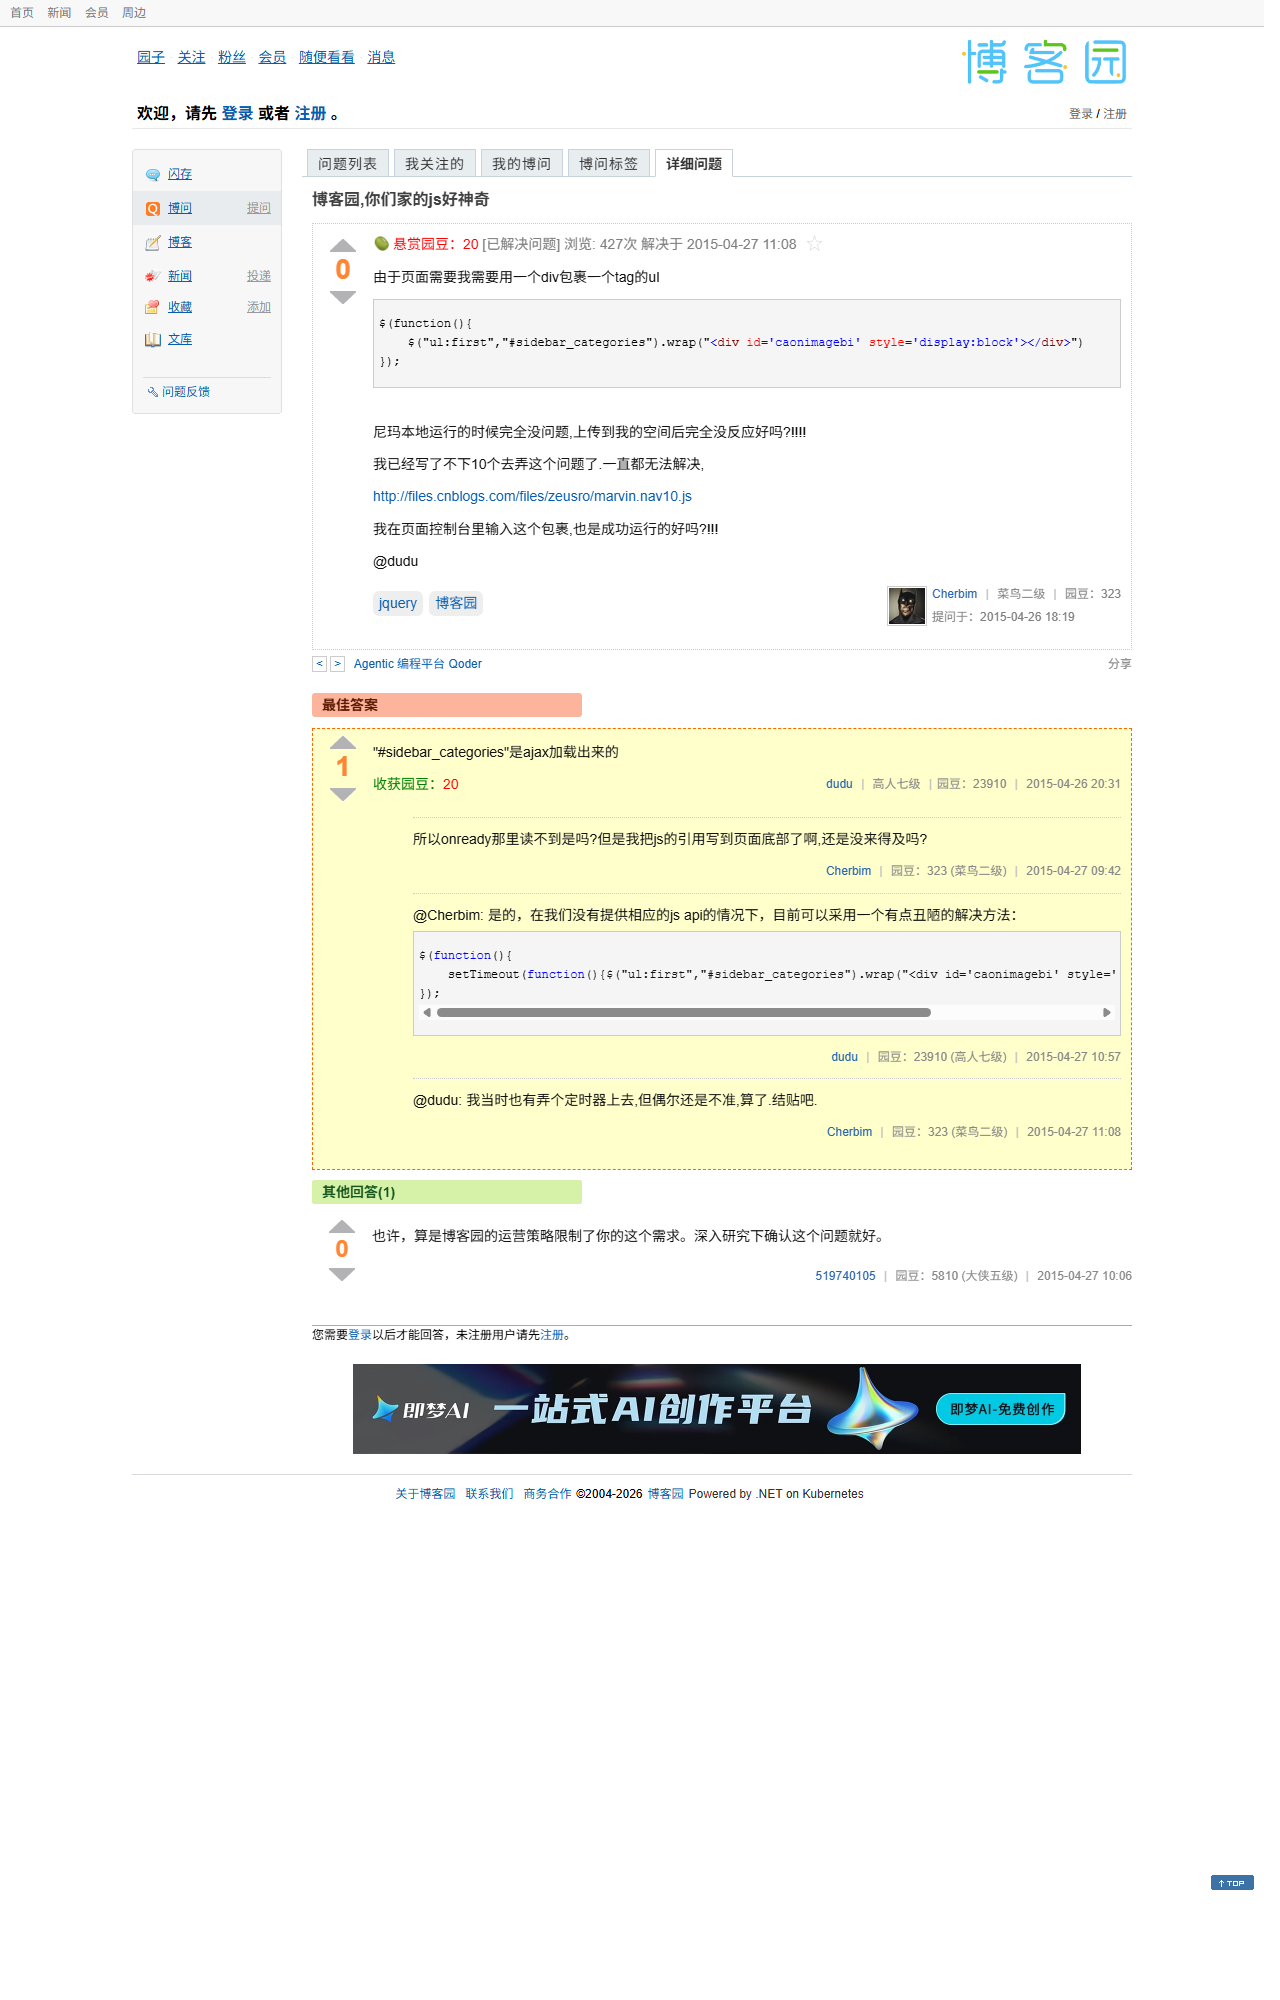
2015-04-26 博客园,你们家的js好神奇
2015-04-26 为你的博客园添加平滑移动到页面顶端的锚点和tag云
首先我的目录是在marvin的基础上二次开发的.然后我发现锚点图和目录都在同一个图上面,所以就一起用了.
返回顶部锚点:
我用以前旧版bilibili的那个函数.可以做到平滑滚动到页面,并且在触顶前不能向下滚屏.具体的看我参考链接.当然因为涉及到js要申请权限,简单的话a标签href用#top当然可以,体验有点差罢了.
然后因为我懒,锚点的出现条件直接和目录的出现条件弄在一起.也就是匹配元素相对滚动条顶部的偏移超过200时显示.
tag云:
我用Google随便找的.用的矢量绘图.
但是这玩意有个局限性,就是其实例化函数限制要用元素ID.于是我用一个div包裹了标签区的ul.然后实例化.实例化成功的时候隐藏掉标签区和标题,设置canvas的蠕动和显示
1
2
3
4
5
6
7
8
9
10
11
12
13
14
15
16
17
18
19
window.onload=function(){
    $("ul:first","#sidebar_categories").wrap("<div id='caonimagebi' style='display:block'></div>")
    if(!$('#myCanvas').tagcanvas({
          textColour: '#519cea',
          outlineColour: '#404040',
          reverse: true,
          depth: 0.8,
          maxSpeed: 0.10
        },'caonimagebi')) {
          console.log("日了狗了")
          $('#myCanvasContainer').hide();
        }
        else{
            $('#myCanvasContainer').css('display', 'block');
            $('#myCanvas').tagcanvas("setspeed", [0.015, -0.05]);
             $('#caonimagebi').css('display', 'none');
              $('.catListTitle:first-child','#sidebar_categories').empty();//去掉随笔分类
        }
               }
但是这样有个局限性,就是因为写在onload里面,有点生硬,你们可以看到,这玩意像是隐搞出来的,不和谐.这就是让我抓狂的地方了.
抓狂:
我就是很好奇,为毛这个包裹方法写在onready里面就不行了,而且是线上的时候不行.我是有在本地测试的,本地写在onready的时候页面很正常,传到博客园就变成这样.
备注:
1博客园的文件系统是软删除,慢更新.就是你删了文件还在,你删了那个文件上传同名文件的话,服务器上的文件还是旧版的,所以需要自己手动修改文件名和相应的引用文件名.
2这个目录有一定的局限性,也就是h2,h3,h4.方法写的不是很健壮,而且目录的高度应该尽可能的根据标题数来计算,然后弄个上限,但是我也懒得改了.还有就是z-index的问题.这个要格外注意下.我是把旁边的锚点和返回顶部设置为999了.
3博客园自带jQuery.所以无需另外引用
2026-01-13 备注
原文是我在博客园的2篇文章和1个问答,我用爬虫扒了下来,并稍微修改了一下。
2015-04-26 19:41 为你的博客园添加平滑移动到页面顶端的锚点和tag云 https://www.cnblogs.com/zeusro/p/4458222.html
2014-05-03 18:58 去把bilibili的返回顶点锚点扒了下来 https://www.cnblogs.com/zeusro/p/3705426.html
现在B站的返回顶点锚点还不如10年前。我已经把它移植到我这个项目中。
提交链接是 247c0101d65b9c580fadc40db32165d2ef84fe07。AI还顺便修复了jQuery的问题,也是神奇了。
Chrome 截图脚本
使用 Chrome 的 --headless=new 模式进行全页面截图:
1
2
3
4
5
$url = "https://q.cnblogs.com/q/71564"
$outputPath = "D:\Zeusro.github.io\img\in-post\bilibili\cnblogs-71564.png"
$chromePath = "C:\Program Files\Google\Chrome\Application\chrome.exe"

& $chromePath --headless=new --disable-gpu --window-size=1280,2000 --virtual-time-budget=10000 --screenshot=$outputPath $url
参数说明:
--headless=new: 使用新的无头模式--disable-gpu: 禁用 GPU 加速--window-size=1280,2000: 设置窗口大小为 1280x2000 像素,足够大的高度可以捕获完整页面--virtual-time-budget=10000: 给页面 10 秒的虚拟时间预算,确保所有内容都加载完成--screenshot=$outputPath: 指定截图保存路径
参考链接:
2014-05-03 Scraping Bilibili’s Back-to-Top Anchor
Today I was idly browsing Bilibili and had been eyeing that anchor mark for a long time. I decided to make it my own, so I got to work.
I mainly use Firefox + Firebug to inspect webpage code. I’m using Nightly, Firefox’s daily update version (not recommended, sometimes it updates three times a day and restarts are very annoying).
Webpage code, CSS, and images are easy to get. Just click where you want, left side shows code, right side shows CSS and other stuff. For background images, right-click the path and open it in a new page to save.
The main trouble was the bound JavaScript events. I was initially stupidly searching for the anchor’s div id, found some things but couldn’t find the event. Later, when I learned to use Firebug properly, it became much easier. The click tag is bound to the goTop function. In Firebug’s console, type “goTop”, then click “RUN”, and the function will appear. After finding it, you can right-click to beautify the source code for easy copying. Typing “goTop()” executes it. It’s different.
Bilibili’s anchor is quite interesting. First, its position is set well, adjusting based on the element’s relative offset in the current viewport. Second, it forces scrolling - after clicking and the function starts, even if you scroll down, it will still scroll to the top with all its might until it fully reaches the top.
1
2
3
4
5
6
7
8
9
10
11
12
13
14
15
16
17
18
19
20
21
22
23
24
25
26
27
28
29
30
31
32
33
34
35
36
37
38
39
40
41
42
43
44
45
46
47
48
49
50
51
52
53
54
55
56
57
58
59
60
61
62
63
<html xmlns="http://www.w3.org/1999/xhtml">
<head>
    <meta http-equiv="Content-Type" content="text/html; charset=utf-8" />
    <title></title>
    <script src="../Scripts/jquery-1.10.2.min.js"></script>
    <script>
        $(function () {
            $('body').append('<div id="gotop" onclick="goTop();"></div>');
            $(window).scroll(function () {
                300 < $(this).scrollTop() ?
                ($('#gotop').show(),
                $('#gotop').css('left', $('.z').offset().left + $('.z').width() + 20),
                $('#gotop').css('top', $(window).height() - 300))
                : $('#gotop').hide()
            });
            $(window).resize(function () {
                $('#gotop').css('left', $('.z').offset().left + $('.z').width() + 20)
            })
        });
        function goTop(u, t, r) {
            var scrollActivate = !0;
            if (scrollActivate) {
                u = u || 0.1;
                t = t || 16;
                var s = 0,
                q = 0,
                o = 0,
                p = 0,
                n = 0,
                j = 0;
                document.documentElement && (s = document.documentElement.scrollLeft || 0, q = document.documentElement.scrollTop || 0);
                document.body && (o = document.body.scrollLeft || 0, p = document.body.scrollTop || 0);
                n = window.scrollX || 0;
                j = window.scrollY || 0;
                s = Math.max(s, Math.max(o, n));
                q = Math.max(q, Math.max(p, j));
                p = 1 + u;
                window.scrollTo(Math.floor(s / p), Math.floor(q / p));
                0 < s || 0 < q ? window.setTimeout('goTop(' + u + ', ' + t + ')', t) : 'undefined' != typeof r && r()
            } else {
                scrollActivate = !0
            }
        }
    </script>
    <style>
        #gotop:hover {
            background-position: 0px -116px;
        }
        #gotop {
            width: 29px;
            height: 106px;
            position: fixed;
            display: none;
            cursor: pointer;
            background: url('go_to_top.png') no-repeat scroll 0px 0px transparent;
        }
    </style>
</head>
<body>
    <div class="z" style="border: 1px dashed; height: 2999px; width: 977px; margin: 0 auto;">
    </div>
</body>
</html>
2015-04-26 CNBlogs, Your JavaScript is Amazing
2015-04-26 Adding Smooth Scroll-to-Top Anchor and Tag Cloud to Your CNBlogs
First, my table of contents is based on marvin’s work, which I further developed. Then I found that the anchor image and table of contents are on the same image, so I used them together.
Back-to-Top Anchor:
I used the function from the old Bilibili version. It can smoothly scroll to the page top, and prevents scrolling down before reaching the top. See my reference link for details. Of course, since it involves JavaScript that requires permissions, you can simply use an anchor tag with href=”#top”, but the experience is a bit poor.
Then because I’m lazy, I made the anchor’s appearance condition the same as the table of contents. That is, it shows when the matched element’s offset relative to the scrollbar top exceeds 200.
Tag Cloud:
I found it randomly on Google. Uses vector graphics.
But this thing has a limitation - its instantiation function requires an element ID. So I wrapped the tag area’s ul with a div, then instantiated it. When instantiation succeeds, hide the tag area and title, set the canvas animation and display.
1
2
3
4
5
6
7
8
9
10
11
12
13
14
15
16
17
18
19
window.onload=function(){
    $("ul:first","#sidebar_categories").wrap("<div id='caonimagebi' style='display:block'></div>")
    if(!$('#myCanvas').tagcanvas({
          textColour: '#519cea',
          outlineColour: '#404040',
          reverse: true,
          depth: 0.8,
          maxSpeed: 0.10
        },'caonimagebi')) {
          console.log("Damn it")
          $('#myCanvasContainer').hide();
        }
        else{
            $('#myCanvasContainer').css('display', 'block');
            $('#myCanvas').tagcanvas("setspeed", [0.015, -0.05]);
             $('#caonimagebi').css('display', 'none');
              $('.catListTitle:first-child','#sidebar_categories').empty();//Remove essay categories
        }
               }
But this has a limitation - because it’s written in onload, it’s a bit abrupt. You can see this thing appears like it was hidden, not harmonious. This is what drives me crazy.
Going Crazy:
I’m just very curious why this wrapping method doesn’t work when written in onready, and it only fails online. I did test locally, and when written in onready locally, the page works normally, but when uploaded to CNBlogs it becomes like this.
CNBlogs, Your JavaScript is Amazing
Notes:
-
CNBlogs’ file system is soft delete, slow update. That is, when you delete a file it’s still there. If you delete a file and upload a file with the same name, the server file is still the old version, so you need to manually change the filename and the corresponding reference filename.
-
This table of contents has certain limitations, namely h2, h3, h4. The method isn’t written very robustly, and the table of contents height should be calculated based on the number of headings as much as possible, then set an upper limit, but I’m too lazy to change it. Also, there’s the z-index issue. This needs special attention. I set the anchor and back-to-top next to it to 999.
-
CNBlogs comes with jQuery built-in, so no need to reference it separately.
2026-01-13 Notes
The original text consists of 2 articles and 1 Q&A from my CNBlogs, which I scraped and slightly modified.
2015-04-26 19:41 Adding Smooth Scroll-to-Top Anchor and Tag Cloud to Your CNBlogs https://www.cnblogs.com/zeusro/p/4458222.html
2014-05-03 18:58 Scraping Bilibili’s Back-to-Top Anchor https://www.cnblogs.com/zeusro/p/3705426.html
Now Bilibili’s back-to-top anchor is worse than 10 years ago. I’ve already ported it to this project.
The commit link is 247c0101d65b9c580fadc40db32165d2ef84fe07. AI also fixed the jQuery issue, which is also amazing.
Chrome Screenshot Script
Using Chrome’s --headless=new mode for full-page screenshots:
1
2
3
4
5
$url = "https://q.cnblogs.com/q/71564"
$outputPath = "D:\Zeusro.github.io\img\in-post\bilibili\cnblogs-71564.png"
$chromePath = "C:\Program Files\Google\Chrome\Application\chrome.exe"

& $chromePath --headless=new --disable-gpu --window-size=1280,2000 --virtual-time-budget=10000 --screenshot=$outputPath $url
Parameter explanation:
--headless=new: Use the new headless mode--disable-gpu: Disable GPU acceleration--window-size=1280,2000: Set window size to 1280x2000 pixels, large enough height to capture the full page--virtual-time-budget=10000: Give the page 10 seconds of virtual time budget to ensure all content is loaded--screenshot=$outputPath: Specify the screenshot save path
References:
Scraping Bilibili’s Back-to-Top Anchor
How to Add a Beautiful Navigation Table of Contents to Your WizNote
2014-05-03 Bilibiliのトップへ戻るアンカーを取得
今日は何もすることがなく、Bilibiliをブラウジングしていて、そのアンカーマークをずっと狙っていました。決心して自分のものにしようと、作業を始めました。
個人的にはFirefox + Firebugでウェブページのコードを確認することを推奨しています。私は夜間版(nightly)を使用しています。これはFirefoxの毎日更新版です(推奨しません。時々1日に3回更新して再起動が必要で非常に面倒です)。
ウェブページのコード、CSS、画像は簡単に取得できます。欲しい場所をクリックするだけで、左側にコード、右側にCSSやその他の情報が表示されます。背景画像の場合は、パスを右クリックして新しいページで開いて保存すればOKです。
主な問題は、バインドされたJavaScriptイベントでした。最初はアンカーのdiv idを探していましたが、いくつか見つかったものの、イベントが見つかりませんでした。後でFirebugの使い方がわかると、ずっと簡単になりました。クリックタグはgoTop関数にバインドされています。Firebugのコンソールで「goTop」と入力し、「RUN」をクリックすると、その関数が表示されます。見つけた後、右クリックしてソースコードを整形し、コピーしやすくできます。「goTop()」と入力すると実行されます。違います。
Bilibiliのアンカーは非常に興味深いです。まず、その位置設定が優れており、現在のビューポート内の要素の相対オフセットに基づいて設定されます。次に、強制的にスクロールさせます。ページをクリックして関数が開始された後、下にスクロールしても、完全にトップに到達するまで全力でトップまでスクロールし続けます。
1
2
3
4
5
6
7
8
9
10
11
12
13
14
15
16
17
18
19
20
21
22
23
24
25
26
27
28
29
30
31
32
33
34
35
36
37
38
39
40
41
42
43
44
45
46
47
48
49
50
51
52
53
54
55
56
57
58
59
60
61
62
63
<html xmlns="http://www.w3.org/1999/xhtml">
<head>
    <meta http-equiv="Content-Type" content="text/html; charset=utf-8" />
    <title></title>
    <script src="../Scripts/jquery-1.10.2.min.js"></script>
    <script>
        $(function () {
            $('body').append('<div id="gotop" onclick="goTop();"></div>');
            $(window).scroll(function () {
                300 < $(this).scrollTop() ?
                ($('#gotop').show(),
                $('#gotop').css('left', $('.z').offset().left + $('.z').width() + 20),
                $('#gotop').css('top', $(window).height() - 300))
                : $('#gotop').hide()
            });
            $(window).resize(function () {
                $('#gotop').css('left', $('.z').offset().left + $('.z').width() + 20)
            })
        });
        function goTop(u, t, r) {
            var scrollActivate = !0;
            if (scrollActivate) {
                u = u || 0.1;
                t = t || 16;
                var s = 0,
                q = 0,
                o = 0,
                p = 0,
                n = 0,
                j = 0;
                document.documentElement && (s = document.documentElement.scrollLeft || 0, q = document.documentElement.scrollTop || 0);
                document.body && (o = document.body.scrollLeft || 0, p = document.body.scrollTop || 0);
                n = window.scrollX || 0;
                j = window.scrollY || 0;
                s = Math.max(s, Math.max(o, n));
                q = Math.max(q, Math.max(p, j));
                p = 1 + u;
                window.scrollTo(Math.floor(s / p), Math.floor(q / p));
                0 < s || 0 < q ? window.setTimeout('goTop(' + u + ', ' + t + ')', t) : 'undefined' != typeof r && r()
            } else {
                scrollActivate = !0
            }
        }
    </script>
    <style>
        #gotop:hover {
            background-position: 0px -116px;
        }
        #gotop {
            width: 29px;
            height: 106px;
            position: fixed;
            display: none;
            cursor: pointer;
            background: url('go_to_top.png') no-repeat scroll 0px 0px transparent;
        }
    </style>
</head>
<body>
    <div class="z" style="border: 1px dashed; height: 2999px; width: 977px; margin: 0 auto;">
    </div>
</body>
</html>
2015-04-26 ブログ園、あなたのJavaScriptは素晴らしい
2015-04-26 ブログ園にスムーズにページトップへ移動するアンカーとタグクラウドを追加
まず、私の目次はmarvinの作品を基に二次開発したものです。そして、アンカー画像と目次が同じ画像上にあることに気づき、一緒に使用しました。
トップへ戻るアンカー:
以前のBilibiliバージョンの関数を使用しました。ページをスムーズにスクロールでき、トップに到達する前に下にスクロールできません。詳細は参考リンクを参照してください。もちろん、JavaScriptには権限が必要なため、シンプルにaタグのhrefに#topを使用することもできますが、体験は少し劣ります。
そして、私は怠け者なので、アンカーの表示条件を目次の表示条件と同じにしました。つまり、マッチした要素のスクロールバートップからの相対オフセットが200を超えたときに表示されます。
タグクラウド:
Googleで適当に見つけました。ベクターグラフィックを使用しています。
しかし、これには制限があります。インスタンス化関数は要素IDを使用する必要があります。そこで、タグエリアのulをdivでラップし、インスタンス化しました。インスタンス化が成功したとき、タグエリアとタイトルを非表示にし、canvasのアニメーションと表示を設定します。
1
2
3
4
5
6
7
8
9
10
11
12
13
14
15
16
17
18
19
window.onload=function(){
    $("ul:first","#sidebar_categories").wrap("<div id='caonimagebi' style='display:block'></div>")
    if(!$('#myCanvas').tagcanvas({
          textColour: '#519cea',
          outlineColour: '#404040',
          reverse: true,
          depth: 0.8,
          maxSpeed: 0.10
        },'caonimagebi')) {
          console.log("クソだ")
          $('#myCanvasContainer').hide();
        }
        else{
            $('#myCanvasContainer').css('display', 'block');
            $('#myCanvas').tagcanvas("setspeed", [0.015, -0.05]);
             $('#caonimagebi').css('display', 'none');
              $('.catListTitle:first-child','#sidebar_categories').empty();//エッセイカテゴリを削除
        }
               }
しかし、これには制限があります。onloadに書かれているため、少し不自然です。この機能が隠されたように表示され、調和していないことがわかります。これが私を狂わせる点です。
狂気:
なぜこのラッピング方法をonreadyに書くと機能しないのか、そしてオンラインでのみ機能しないのか、非常に興味深いです。ローカルでテストしましたが、ローカルでonreadyに書いたときはページが正常に動作しましたが、ブログ園にアップロードするとこのようになります。
備考:
-
ブログ園のファイルシステムはソフト削除、遅延更新です。つまり、ファイルを削除してもまだ存在します。ファイルを削除して同じ名前のファイルをアップロードすると、サーバー上のファイルはまだ古いバージョンのままなので、ファイル名と対応する参照ファイル名を手動で変更する必要があります。
-
この目次には一定の制限があります。つまり、h2、h3、h4です。メソッドはあまり堅牢に書かれておらず、目次の高さは可能な限り見出し数に基づいて計算し、上限を設定する必要がありますが、変更するのが面倒です。また、z-indexの問題もあります。これは特に注意が必要です。隣のアンカーとトップへ戻るを999に設定しました。
-
ブログ園にはjQueryが組み込まれているため、別途参照する必要はありません。
2026-01-13 備考
原文は私のブログ園の2つの記事と1つのQ&Aで、クローラーで取得し、少し修正しました。
2015-04-26 19:41 ブログ園にスムーズにページトップへ移動するアンカーとタグクラウドを追加 https://www.cnblogs.com/zeusro/p/4458222.html
2014-05-03 18:58 Bilibiliのトップへ戻るアンカーを取得 https://www.cnblogs.com/zeusro/p/3705426.html
現在のBilibiliのトップへ戻るアンカーは10年前よりも劣っています。すでにこのプロジェクトに移植しました。
コミットリンクは 247c0101d65b9c580fadc40db32165d2ef84fe07です。AIはjQueryの問題も修正しました。これも素晴らしいです。
Chromeスクリーンショットスクリプト
Chromeの--headless=newモードを使用して全ページスクリーンショットを取得:
1
2
3
4
5
$url = "https://q.cnblogs.com/q/71564"
$outputPath = "D:\Zeusro.github.io\img\in-post\bilibili\cnblogs-71564.png"
$chromePath = "C:\Program Files\Google\Chrome\Application\chrome.exe"

& $chromePath --headless=new --disable-gpu --window-size=1280,2000 --virtual-time-budget=10000 --screenshot=$outputPath $url
パラメータ説明:
--headless=new: 新しいヘッドレスモードを使用--disable-gpu: GPUアクセラレーションを無効化--window-size=1280,2000: ウィンドウサイズを1280x2000ピクセルに設定。全ページをキャプチャするのに十分な高さ--virtual-time-budget=10000: ページに10秒の仮想時間予算を与え、すべてのコンテンツが読み込まれることを確保--screenshot=$outputPath: スクリーンショットの保存パスを指定
参考リンク:
2014-05-03 Извлечение якоря возврата наверх Bilibili
Сегодня мне было нечего делать, я просматривал Bilibili и давно засматривался на эту якорную метку. Решил сделать её своей, поэтому приступил к работе.
Лично я рекомендую Firefox + Firebug для просмотра кода веб-страниц. Я использую Nightly, ежедневную обновляемую версию Firefox (не рекомендуется, иногда обновляется три раза в день, перезапуски очень раздражают).
Код веб-страницы, CSS и изображения легко получить. Просто кликайте где хотите, слева код, справа CSS и прочее. Для фоновых изображений просто правой кнопкой мыши по пути, откройте в новой странице и сохраните.
Основная проблема была в привязанных событиях JavaScript. Сначала я тупо искал div id якоря, нашёл кое-что, но никак не мог найти событие. Позже, когда научился использовать Firebug, стало намного проще. Тег клика привязан к функции goTop. В консоли Firebug введите “goTop”, затем нажмите “RUN”, и функция появится. После нахождения можно правой кнопкой мыши форматировать исходный код для удобного копирования. Ввод “goTop()” выполняет её. Это другое.
Якорь Bilibili довольно интересен. Во-первых, его позиция установлена хорошо, настраивается в зависимости от относительного смещения элемента в текущем окне просмотра. Во-вторых, он заставляет прокручивать - после клика и начала работы функции, даже если вы прокручиваете вниз, он всё равно будет прокручивать наверх изо всех сил, пока полностью не достигнет верха.
1
2
3
4
5
6
7
8
9
10
11
12
13
14
15
16
17
18
19
20
21
22
23
24
25
26
27
28
29
30
31
32
33
34
35
36
37
38
39
40
41
42
43
44
45
46
47
48
49
50
51
52
53
54
55
56
57
58
59
60
61
62
63
<html xmlns="http://www.w3.org/1999/xhtml">
<head>
    <meta http-equiv="Content-Type" content="text/html; charset=utf-8" />
    <title></title>
    <script src="../Scripts/jquery-1.10.2.min.js"></script>
    <script>
        $(function () {
            $('body').append('<div id="gotop" onclick="goTop();"></div>');
            $(window).scroll(function () {
                300 < $(this).scrollTop() ?
                ($('#gotop').show(),
                $('#gotop').css('left', $('.z').offset().left + $('.z').width() + 20),
                $('#gotop').css('top', $(window).height() - 300))
                : $('#gotop').hide()
            });
            $(window).resize(function () {
                $('#gotop').css('left', $('.z').offset().left + $('.z').width() + 20)
            })
        });
        function goTop(u, t, r) {
            var scrollActivate = !0;
            if (scrollActivate) {
                u = u || 0.1;
                t = t || 16;
                var s = 0,
                q = 0,
                o = 0,
                p = 0,
                n = 0,
                j = 0;
                document.documentElement && (s = document.documentElement.scrollLeft || 0, q = document.documentElement.scrollTop || 0);
                document.body && (o = document.body.scrollLeft || 0, p = document.body.scrollTop || 0);
                n = window.scrollX || 0;
                j = window.scrollY || 0;
                s = Math.max(s, Math.max(o, n));
                q = Math.max(q, Math.max(p, j));
                p = 1 + u;
                window.scrollTo(Math.floor(s / p), Math.floor(q / p));
                0 < s || 0 < q ? window.setTimeout('goTop(' + u + ', ' + t + ')', t) : 'undefined' != typeof r && r()
            } else {
                scrollActivate = !0
            }
        }
    </script>
    <style>
        #gotop:hover {
            background-position: 0px -116px;
        }
        #gotop {
            width: 29px;
            height: 106px;
            position: fixed;
            display: none;
            cursor: pointer;
            background: url('go_to_top.png') no-repeat scroll 0px 0px transparent;
        }
    </style>
</head>
<body>
    <div class="z" style="border: 1px dashed; height: 2999px; width: 977px; margin: 0 auto;">
    </div>
</body>
</html>
2015-04-26 CNBlogs, ваш JavaScript потрясающий
2015-04-26 Добавление плавного якоря возврата наверх и облака тегов в ваш CNBlogs
Сначала мое оглавление основано на работе marvin, которую я доработал. Затем я обнаружил, что изображение якоря и оглавление находятся на одном изображении, поэтому использовал их вместе.
Якорь возврата наверх:
Я использовал функцию из старой версии Bilibili. Она может плавно прокручивать страницу наверх и предотвращает прокрутку вниз до достижения верха. Подробности смотрите в моей ссылке. Конечно, поскольку это связано с JavaScript, требующим разрешений, можно просто использовать тег якоря с href=”#top”, но опыт будет немного хуже.
Затем, поскольку я ленив, я сделал условие появления якоря таким же, как у оглавления. То есть, оно показывается, когда смещение совпадающего элемента относительно верха полосы прокрутки превышает 200.
Облако тегов:
Я нашёл это случайно в Google. Использует векторную графику.
Но у этой штуки есть ограничение - её функция инициализации требует ID элемента. Поэтому я обернул ul области тегов в div, затем инициализировал. При успешной инициализации скрываю область тегов и заголовок, устанавливаю анимацию и отображение canvas.
1
2
3
4
5
6
7
8
9
10
11
12
13
14
15
16
17
18
19
window.onload=function(){
    $("ul:first","#sidebar_categories").wrap("<div id='caonimagebi' style='display:block'></div>")
    if(!$('#myCanvas').tagcanvas({
          textColour: '#519cea',
          outlineColour: '#404040',
          reverse: true,
          depth: 0.8,
          maxSpeed: 0.10
        },'caonimagebi')) {
          console.log("Чёрт возьми")
          $('#myCanvasContainer').hide();
        }
        else{
            $('#myCanvasContainer').css('display', 'block');
            $('#myCanvas').tagcanvas("setspeed", [0.015, -0.05]);
             $('#caonimagebi').css('display', 'none');
              $('.catListTitle:first-child','#sidebar_categories').empty();//Удалить категории эссе
        }
               }
Но это имеет ограничение - поскольку написано в onload, это немного резко. Вы можете видеть, что эта штука появляется как будто была скрыта, не гармонично. Это то, что сводит меня с ума.
Схожу с ума:
Мне просто очень любопытно, почему этот метод обёртки не работает, когда написан в onready, и это не работает только онлайн. Я тестировал локально, и когда написал в onready локально, страница работала нормально, но при загрузке на CNBlogs становится так.
CNBlogs, ваш JavaScript потрясающий
Примечания:
-
Файловая система CNBlogs - это мягкое удаление, медленное обновление. То есть, когда вы удаляете файл, он всё ещё там. Если вы удалите файл и загрузите файл с тем же именем, файл на сервере всё ещё старая версия, поэтому нужно вручную изменить имя файла и соответствующее имя файла ссылки.
-
Это оглавление имеет определённые ограничения, а именно h2, h3, h4. Метод написан не очень надёжно, и высота оглавления должна быть рассчитана на основе количества заголовков, насколько это возможно, затем установить верхний предел, но мне лень это менять. Также есть проблема z-index. Это требует особого внимания. Я установил якорь и возврат наверх рядом с ним на 999.
-
CNBlogs поставляется со встроенным jQuery, поэтому не нужно ссылаться на него отдельно.
2026-01-13 Примечания
Оригинальный текст состоит из 2 статей и 1 Q&A из моего CNBlogs, которые я извлёк с помощью краулера и слегка изменил.
2015-04-26 19:41 Добавление плавного якоря возврата наверх и облака тегов в ваш CNBlogs https://www.cnblogs.com/zeusro/p/4458222.html
2014-05-03 18:58 Извлечение якоря возврата наверх Bilibili https://www.cnblogs.com/zeusro/p/3705426.html
Теперь якорь возврата наверх Bilibili хуже, чем 10 лет назад. Я уже перенёс его в этот проект.
Ссылка на коммит: 247c0101d65b9c580fadc40db32165d2ef84fe07. AI также исправил проблему jQuery, что тоже удивительно.
Скрипт скриншота Chrome
Использование режима --headless=new Chrome для полностраничных скриншотов:
1
2
3
4
5
$url = "https://q.cnblogs.com/q/71564"
$outputPath = "D:\Zeusro.github.io\img\in-post\bilibili\cnblogs-71564.png"
$chromePath = "C:\Program Files\Google\Chrome\Application\chrome.exe"

& $chromePath --headless=new --disable-gpu --window-size=1280,2000 --virtual-time-budget=10000 --screenshot=$outputPath $url
Объяснение параметров:
--headless=new: Использовать новый режим без интерфейса--disable-gpu: Отключить ускорение GPU--window-size=1280,2000: Установить размер окна 1280x2000 пикселей, достаточно большая высота для захвата полной страницы--virtual-time-budget=10000: Дать странице 10 секунд виртуального времени, чтобы убедиться, что весь контент загружен--screenshot=$outputPath: Указать путь сохранения скриншота
Ссылки:
Извлечение якоря возврата наверх Bilibili
Как добавить красивую навигационную таблицу содержания в ваш WizNote
💬 讨论 / Discussion
对这篇文章有想法?欢迎在 GitHub 上发起讨论。
Have thoughts on this post? Start a discussion on GitHub.