前言
接收到 Gogs 的web hook 之后,Jenkins对Java 项目进行自动构建/测试, 最后将应用容器化,推送到私有 docker 源(阿里云)
前期准备
- gitea/Gogs
- Jenkins
- Mask Passwords Plugin
- Generic Webhook Trigger
- Gogs plugin
- Maven Integration plugin
- Gradle Plugin
也许可用到的 Jenkins 插件:
- Deploy to container Plugin
- Docker Plugin
java项目的配置
自定义私有框架依赖,那么前置工作需要先更新Jenkins环境的依赖,打包到 maven local 里面.gradle 同理(gradle可以指定先读取本地 maven 依赖,所以都一样).
maven插件的选择(1):dockerfile-maven-extension
1
2
3
我对这个插件比较熟,所以我一般用这个.不过这插件有个限制, **dockerfile 必须放在模块根目录里面.**

切换到模块所在的目录,然后执行`mvn install dockerfile:build -Dmaven.test.skip=true`,源代码没问题的话就可以在 docker image ls里面看到 **${docker.image.host}/${docker.image.image}:${project.version}** 这个新镜像的产生.
pom.xml
1
2
3
4
5
6
7
8
9
10
11
12
13
14
15
16
17
18
19
20
21
22
23
24
25
26
27
28
29
30
31
32
33
34
35
36
37
38
39
40
41
42
43
44
45
46
47
	<properties>
		<docker.image.host>${docker-registry}</docker.image.host>
		<docker.image.image>${imagename}</docker.image.image>
		<project.build.sourceEncoding>UTF-8</project.build.sourceEncoding>
		<project.reporting.outputEncoding>UTF-8</project.reporting.outputEncoding>
		<java.version>1.8</java.version>
	</properties>

<build>
		<extensions>
			<extension>
				<groupId>com.spotify</groupId>
				<artifactId>dockerfile-maven-extension</artifactId>
				<version>1.4.0</version>
			</extension>
		</extensions>
		<plugins>
			<plugin>
				<groupId>org.springframework.boot</groupId>
				<artifactId>spring-boot-maven-plugin</artifactId>
			</plugin>
			<plugin>
				<groupId>com.spotify</groupId>
				<artifactId>dockerfile-maven-plugin</artifactId>
				<version>1.4.0</version>
				<configuration>
					<repository>${docker.image.host}/${docker.image.image}</repository>
					<tag>${project.version}</tag>
					<buildArgs>
						<JAR_FILE>target/${project.build.finalName}.jar</JAR_FILE>
					</buildArgs>
				</configuration>
				<dependencies>
					<dependency>
						<groupId>org.codehaus.plexus</groupId>
						<artifactId>plexus-archiver</artifactId>
						<version>3.4</version>
					</dependency>
					<dependency>
						<groupId>javax.activation</groupId>
						<artifactId>javax.activation-api</artifactId>
						<version>1.2.0</version>
					</dependency>
				</dependencies>
			</plugin>
		</plugins>
	</build>
maven插件的选择(2):maven-dependency-plugin + docker-maven-plugin
1
2
3
这2个插件比较复杂,主要因为它把 dockerfile 放到了项目的 docker 目录,导致需要copy-resources这一步

切换到模块所在的目录,然后执行 `mvn `
pom.xml
1
2
3
4
5
6
7
8
9
10
11
12
13
14
15
16
17
18
19
20
21
22
23
24
25
26
27
28
29
30
31
32
33
34
35
36
37
38
39
40
41
42
43
44
45
46
47
48
49
50
51
52
53
54
55
56
57
58
59
60
61
62
63
64
65
66
67
68
69
70
71
72
73
74
75
76
77
78
79
80
81
82
83
84
85
86
87
88
89
90
91
92
93
94
95

<build>
		<plugins>
			<plugin>
				<groupId>org.apache.maven.plugins</groupId>
				<artifactId>maven-jar-plugin</artifactId>
				<version>2.6</version>
				<configuration>
					<skip>true</skip>
					<archive>
						<manifest>
							<addClasspath>true</addClasspath>
							<classpathPrefix>lib/</classpathPrefix>
							<mainClass>com.amiba.zwd.pic.web.ZwdPicWebApplication</mainClass>
						</manifest>
					</archive>
					<outputDirectory>target/release</outputDirectory>
				</configuration>
			</plugin>
			<plugin>
				<groupId>org.apache.maven.plugins</groupId>
				<artifactId>maven-dependency-plugin</artifactId>
				<version>2.1</version>
				<executions>
					<execution>
						<id>copy-dependencies</id>
						<phase>package</phase>
						<goals>
							<goal>copy-dependencies</goal>
						</goals>
						<configuration>
							<includeScope>compile</includeScope>
							<outputDirectory>target/release/lib</outputDirectory>
						</configuration>
					</execution>
				</executions>
			</plugin>
			<plugin>
				<groupId>org.apache.maven.plugins</groupId>
				<artifactId>maven-resources-plugin</artifactId>
				<version>2.6</version>
				<executions>
					<execution>
						<id>text</id>
						<phase>package</phase>
						<goals>
							<goal>copy-resources</goal>
						</goals>
						<configuration>
							<outputDirectory>target/release</outputDirectory>
							<encoding>UTF-8</encoding>
							<resources>
								<resource>
									<directory>config</directory>
									<includes>
										<include>*.*</include>
									</includes>
									<targetPath>config</targetPath>
								</resource>
								<resource>
									<directory>bin</directory>
									<includes>
										<include>*.*</include>
									</includes>
									<targetPath>bin</targetPath>
								</resource>
								<resource>
									<directory>src/main/docker</directory>
								</resource>
							</resources>
						</configuration>
					</execution>
				</executions>
			</plugin>
			<plugin>
				<groupId>com.spotify</groupId>
				<artifactId>docker-maven-plugin</artifactId>
				<version>0.4.13</version>
				<executions>
					<execution>
						<phase>package</phase>
						<goals>
							<goal>build</goal>
						</goals>
						<configuration>
							<imageName>${project.artifactId}:${project.version}</imageName>
						</configuration>
					</execution>
				</executions>
				<configuration>
					<dockerDirectory>target/release</dockerDirectory>
				</configuration>
			</plugin>
		</plugins>
	</build>
gradle插件的选择:com.palantir.docker
1
2
3
gradle <module>:build -x test --debug  <module>:docker

gradle比 maven 好的地方就在于简洁高效,而且可以继续复用 mavenlocal 和 maven 的远程仓库.
1
2
3
4
5
6
7
8
9
10
11
12
13
14
15
16
17
18
19
20
21
22
23
24
25
26
27
28
29
30
31
32
33
34
35
36
37
38
39
40
41
42
43
44
45
apply plugin: 'com.palantir.docker'
apply plugin: 'application'
apply plugin: 'org.springframework.boot'


group = '${docker-registry}'
version = project.findProperty('projVersion') ?: '3.0.7'
mainClassName = 'com.zeusro.SBApplication'

buildscript {
    ext {
        springBootVersion = '2.0.4.RELEASE'
    }
    repositories {
        mavenLocal()
        maven { url 'https://maven.aliyun.com/nexus/content/groups/public/' }
        maven { url 'https://maven.aliyun.com/nexus/content/repositories/jcenter' }
        maven { url "https://plugins.gradle.org/m2/" }
    }
    dependencies {
        classpath("org.springframework.boot:spring-boot-gradle-plugin:${springBootVersion}")
        classpath('gradle.plugin.com.palantir.gradle.docker:gradle-docker:0.19.2')
    }
}


tasks.withType(JavaCompile) {
	options.encoding = 'UTF-8'
}
dependencies {

    compile 'org.mybatis.spring.boot:mybatis-spring-boot-starter:1.3.0'
    compile group: 'org.springframework.boot', name: 'spring-boot-starter-thymeleaf', version: '2.0.4.RELEASE'
    testCompile group: 'org.springframework.boot', name: 'spring-boot-starter-test', version: '2.0.4.RELEASE'
    compile group: 'org.springframework.data', name: 'spring-data-redis', version: '2.0.6.RELEASE'
    compile 'net.sourceforge.nekohtml:nekohtml:1.9.21'
}

docker {
    dockerfile file('Dockerfile') //DockerFile路径
    name "${project.group}/${jar.baseName}:${jar.version}"
    files jar.archivePath
    buildArgs(['JAR_FILE': "${jar.archiveName}"])
}
自动化构建的理念
源代码分为 master 和 develop分支
develop 对应 docker image的 latest 版本,表示每日更新;
master 提取gradle 的 version 作为tag, 表示一种稳定的发布.master 触发有2种机制,一种是 tag event,一种是merge/push event.因为 tag 事件需要自己写一些 git的操作,我一般偷懒,选择 merge/push event 作为触发.
本文将先后介绍2种触发方式在 Jenkins 配置上面的细微差别.
Jenkins 的配置
创建的时候选择 maven job
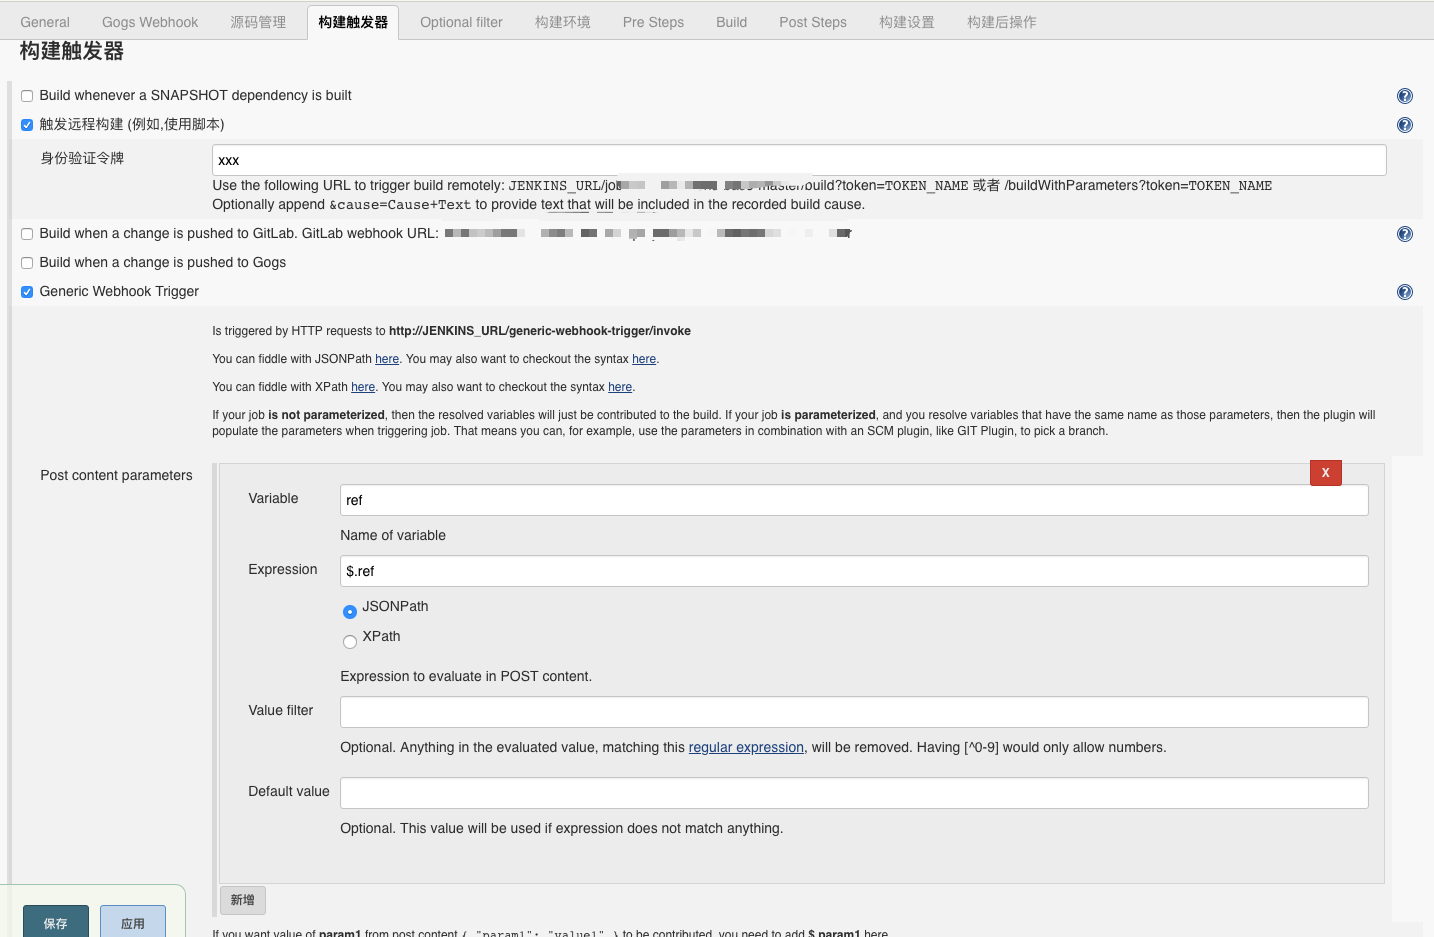
配置触发器
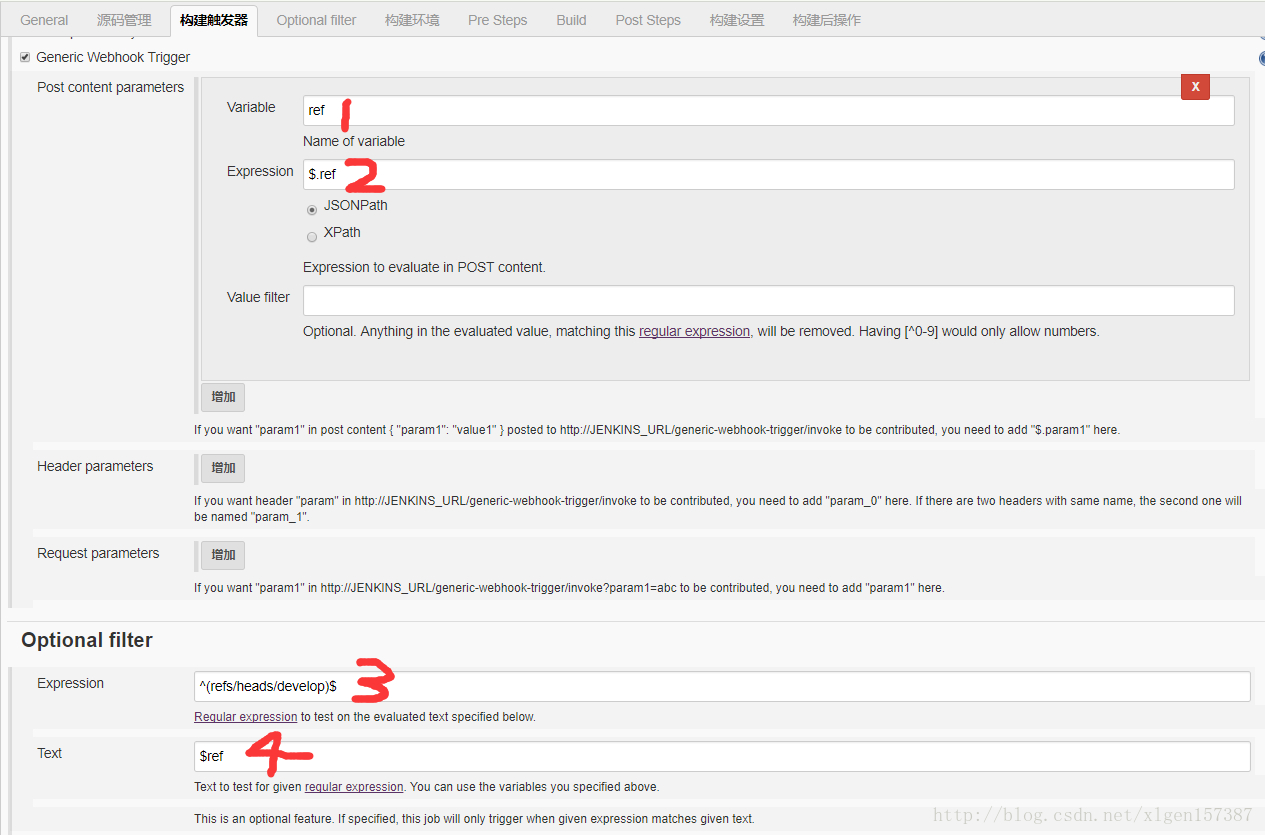
这里先介绍一下Generic Webhook Trigger 这个插件.
Generic Webhook Trigger主要有: Post content parameters、 Header parameters、Request parameters和Optional filter这几个组成。
其中,Post content parameters是对POST请求数据的处理,其他 Header parameters、Request parameters类似,在众多变量中,我们可以筛选到一个具有标识分支的变量,ref。
当我们push到develop时,WebHook推送的信息中,ref为refs/heads/develop,而push到master是ref则为refs/heads/master,所以使用Generic Webhook Trigger Plugin则可以通过正则对推送内容中的ref进行匹配构建.
如果是master merge/push 事件的话,Expression填^(refs/heads/master)$;
develop merge/push 事件的话,Expression填^(refs/heads/develop)$;
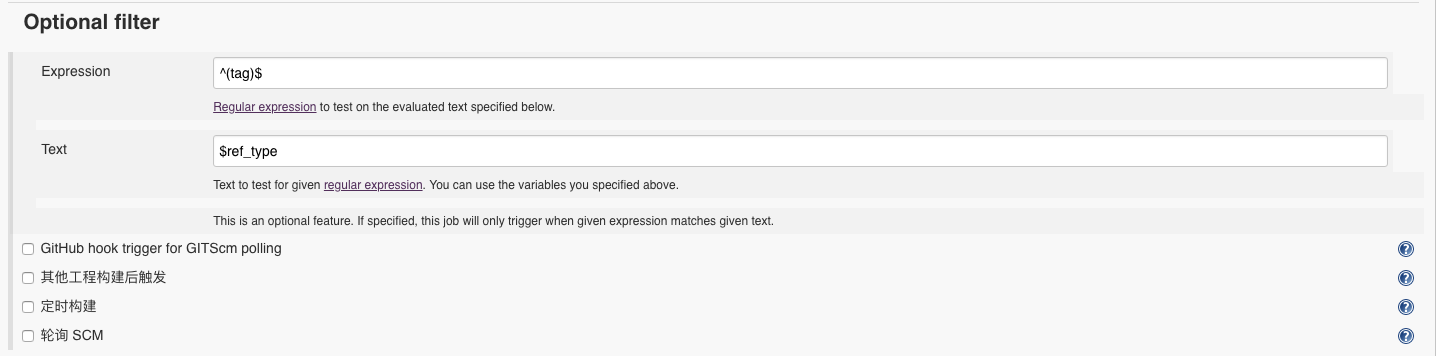
这个 Optional filter 很关键.
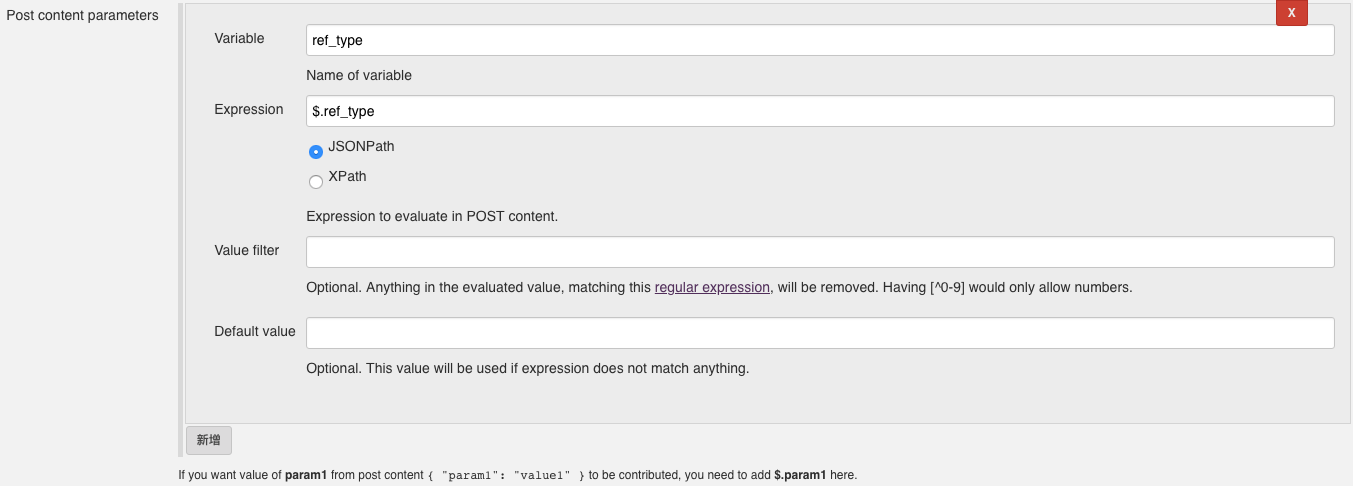
如果是 git 的 tag 事件的话,则是
参考: 使用Generic Webhook Trigger插件实现Jenkins+WebHooks(码云)持续集成–指定具体项目和分支进行集成
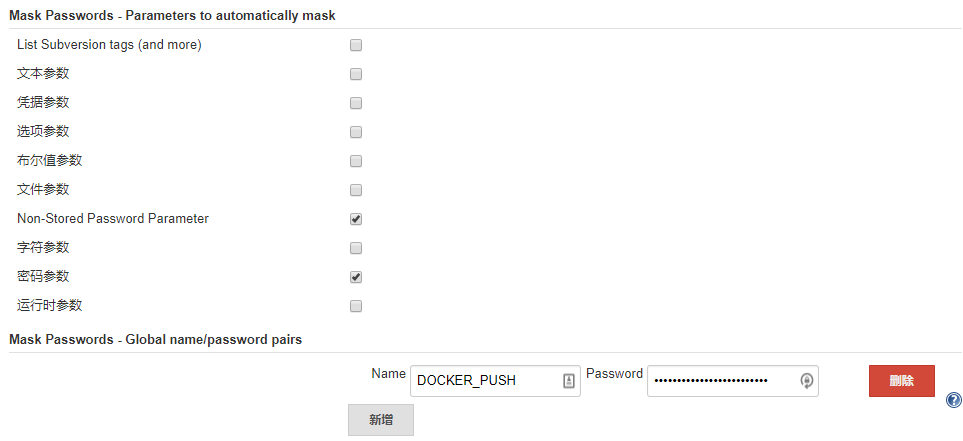
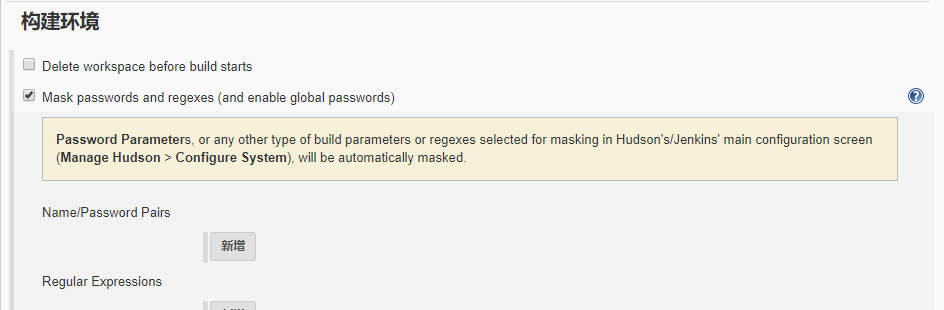
MasK password 的设置(选配)
全局设置
maven 构建
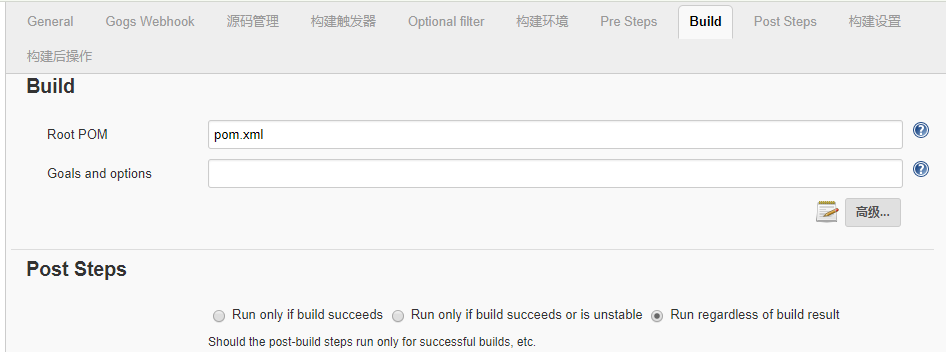
Post Steps的内容是执行Shell
1
2
3
4
5
6
7
8
9
cd xxxx
mvn versions:set -DnewVersion=latest
cd ..
mvn clean package
cd xxxx
mvn install dockerfile:build -Dmaven.test.skip=true
export image=abcde/sadasdf
docker login --username=aaaaaa --password=${DOCKER_PUSH} registry.docker.com
docker push $image:latest;
这里按需配置即可.DOCKER_PUSH对应系统配置的mask password.
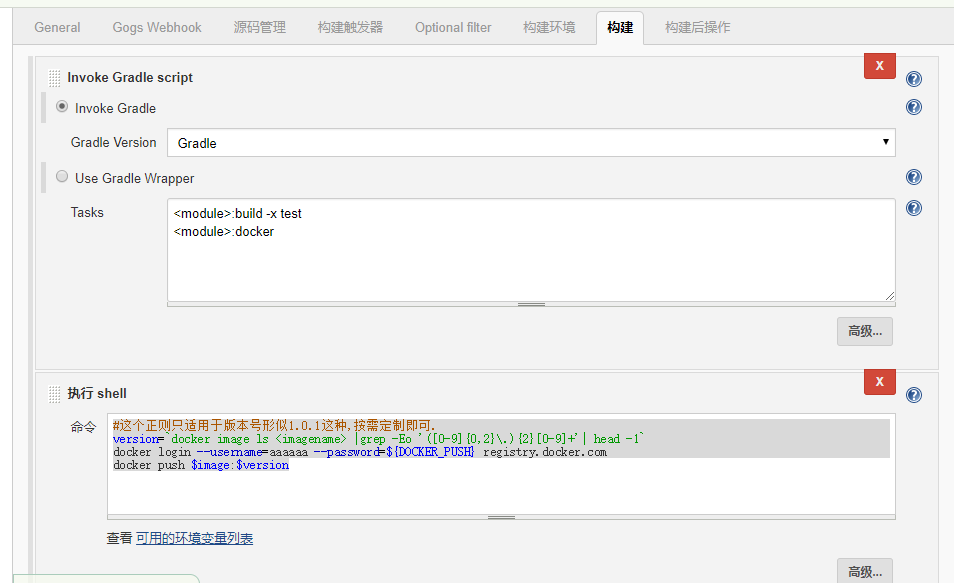
gradle构建
创建一个free style的Jenkins job.构建步骤先增加Invoke Gradle script
1
2
3
4
#这个正则只适用于版本号形似1.0.1这种,按需定制即可.
version=`docker image ls <imagename> |grep -Eo '([0-9]{0,2}\.){2}[0-9]+'| head -1`
docker login --username=aaaaaa --password=${DOCKER_PUSH} registry.docker.com
docker push $image:$version
gitea/gogs 的配置
加一个 gogs型的 web hook,触发类型按照实际需要配置就行. 地址填 Jenkins job里面写的 url.形似http://[host]/generic-webhook-trigger/invoke?token=abc123
下图中身份验证令牌打的马赛克就是了.
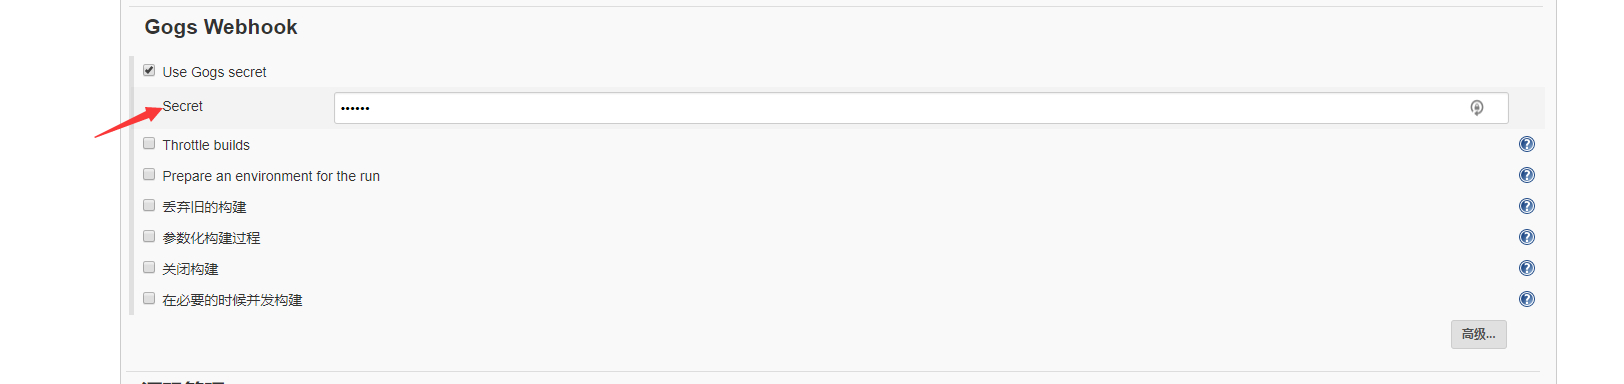
如果你还嫌不够安全,可以在为触发构建添加一个Secret,对应的jenkins设置处如下图:
事件的就按照实际需要了,我一般勾选merger/tag这2类事件.最后点击测试web hook检查一下Jenkins的构建就好了.

额外说明一点,构建同一个仓库develop和master分支对应的2个Jenkins job可以填同一个url,因为我们用了Generic Webhook Trigger ,满足条件才会触发构建
其他注意事项:
gradle相关问题
gradle项目接入jenkins,因为develop分支对应的项目版本要为latest,这个镜像构建出来的才为latest,所以需要为build.gradle添加version设置,如:
1
2
3
4
5
if (project.hasProperty('projVersion')) {
  project.version = project.projVersion
} else {
  project.version = '10.0.0'
}
构建时便可以动态改变版本了。
1
gradle -PprojVersion=latest build
maven相关问题
1
2
	# 这样构建出来的jar包是带latest结尾的
	mvn versions:set -DnewVersion=latest
其他依赖的问题
需要导入本地jar时,有两种方法:
- 传统方法,直接拉到jenkins所在服务器,进行手动导包。
- 创建Jenkins项目,进行自动构建并执行导入仓库命令。
介绍一些优化技巧
-
设置Jenkins国内镜像 【系统管理】【管理插件】【高级】升级站点项的的地址修改成 https://mirrors.tuna.tsinghua.edu.cn/jenkins/updates/2.107/update-center.json
-
gitlab-hook安装失败的问题 https://stackoverflow.com/questions/44403642/jenkins-plugin-installation-failing
-
- 安装Locale plugin
- Jenkins->【系统管理】->【系统设置】->【Locale】,输入:zh_CN